Out of all of the support requests we receive by far the majority of them are about connection issues. In most cases these problems are caused by over-zealous anti-virus/anti-malware software that use real-time protection.
We have released a new application called PortCheck to help identify where the issues are occurring as quite often they can be difficult to diagnose. More about that in a moment.
This is a very long post so please bear with us. It covers virtually everything we do to help our customers fix connection issues, so there is a lot of information here.
We take you step-by-step through the process of determining what is causing the connection issues. Hang in there.
Important: If you don’t have the PhonePad workstation software installed on your Server or Host PC, please download and install it now. It’s important to help isolate connection issues.
Part A – Checking the Server or Host PC
1 – Make Sure the Services Are Running
On your Server or Host PC, open Control Center and check the status of each PhonePad 5 Service.
- If any installed services aren’t running then start them.
- Stop and start the PhonePad Server service.
- Reboot the Server or Host PC.
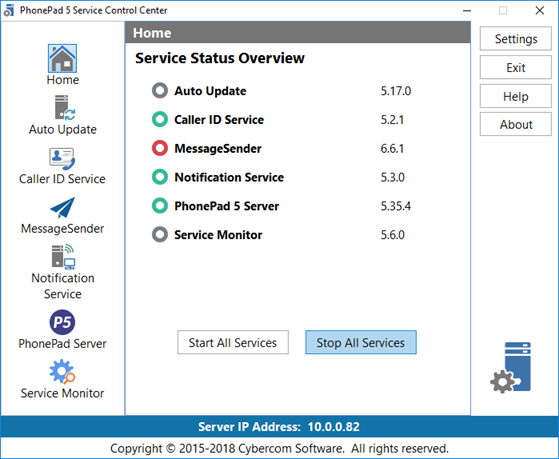
2 – Check the PhonePad Server Settings
- Select PhonePad Server in Control Center.
- Server IP Address should be blank. The only time it shouldn’t be blank is if the Server or Host PC has more than one IP Address (usually due to multiple network interfaces cards (NICs) or it has both an Ethernet and Wireless LAN connection).
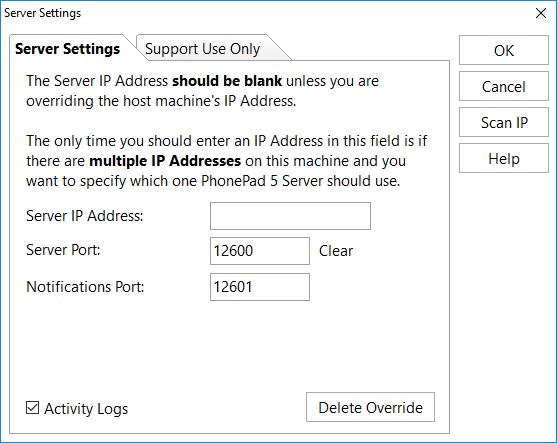
- If Server IP Address is not blank then click Scan IP to see if the Server or Host PC has more than one IP Address.
- In this example, the Server or Host PC has two IP Addresses.
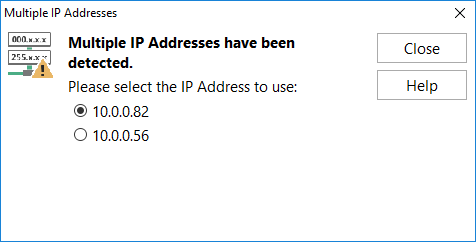
- We need to choose the correct one to use as PhonePad Server may use the wrong one.
- Select the correct IP Address to use and then click Close.
- In this example we selected the first IP Address that was listed.
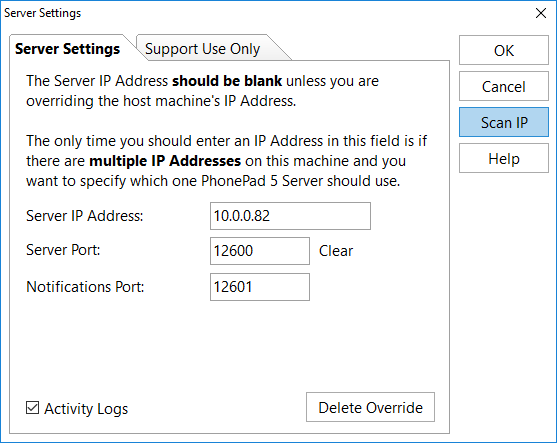
- The best way to test this is to stop and start the PhonePad Server service in ControlCenter and try logging in to PhonePad.
- If it doesn’t work then repeat steps 3 to 8.
- Two other things that are important are the Server Port and Notifications Port settings.
- Server Port should be set to 12600.
- Notifications Port should be set to 12601.
Please Remember This: The Server IP Address setting should be blank unless the Server or Host PC has more than one IP Address.
If you are now able to login to PhonePad successfully then you don’t need to proceed any further.
If you’re still unable to login to PhonePad then proceed to the next step.
3 – Scan the Server Ports
If the services are definitely running then they will have tried to open the ports they use. If PhonePad still can’t connect then we need to check that the ports are still open. This is where we use the new PortCheck program.
- Â Download PortCheck.
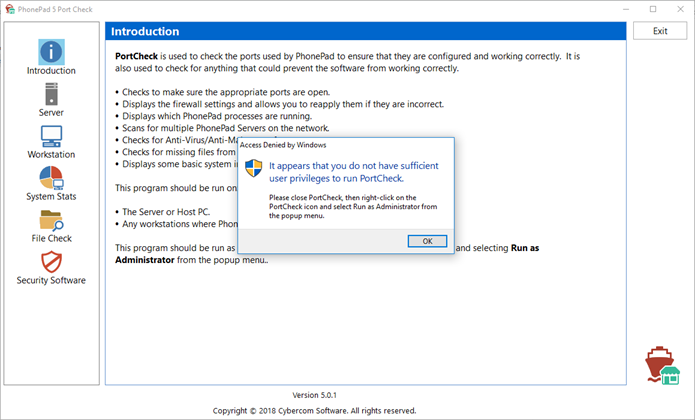
-  Open PortCheck by right-clicking on its icon and selecting Run as Administrator from the popup menu. If you don’t do this you will get this message:
- Select Server.
- Click Scan.
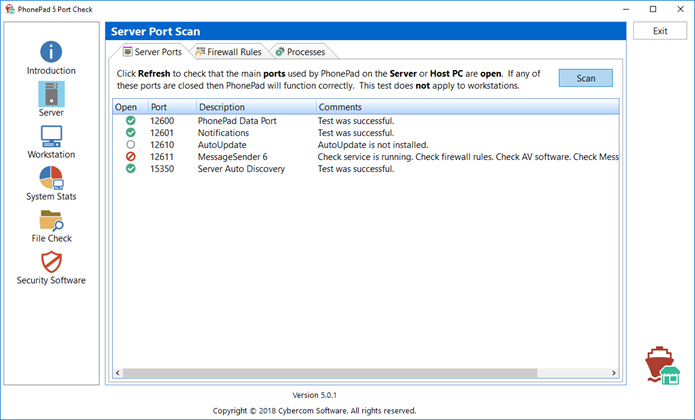
A green tick or check mark icon means a port is open. That’s good news.
A red icon means a port is closed. That’s bad news. This means that either the service is not running or something is blocking the port.
A grey circle icon means that the port is not responding because the service is not installed.
If any of the port scans fail (display a red icon) then we need to find out what is blocking the port. In most cases this will be a firewall, anti-virus or anti-malware software.
4 – Server Firewall Rules
The next step is to check the Server Firewall Rules.
- Select the Firewall Rules tab under Server.
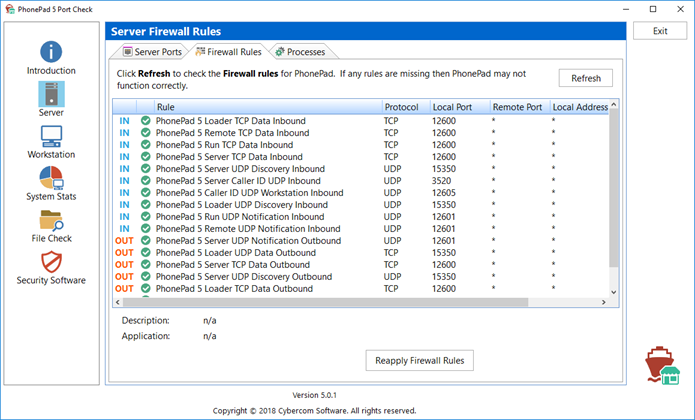
- There will be around 17 rules – inbound and outbound.
- Click the Reapply Firewall Rules button just to make sure they’re all there.
- Now select Server Ports again and re-scan the ports by clicking the Scan button.
5 – Are All of the Files There?
If there are ports that still show as closed in the port scan then we need to check if there are any files missing from the installation.
- Select File Check.
- Click the Scan button.
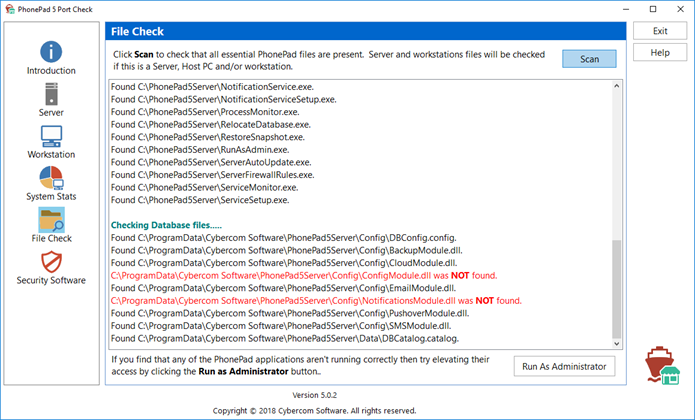
The file checking process will detect if the computer is a Server or Host PC, and/or Workstation. It will then scan for the appropriate files. If there are any files missing they will be shown in red.
In this example (which actually happened to a client), two important database files are missing. The anti-virus software quarantined them because it suspected they were infected by a virus. On further investigation it was discovered that these were false positives. The anti-virus company was contacted and they released an update to fix it.
The problem with this is it prevented the PhonePad Server starting up correctly and therefore the ports it used were not opened.
If you have missing files then run the server update again and then re-scan for the files. If the files are still missing then it means your security software is still quarantining them. You may need to configure your security software to exclude these files.
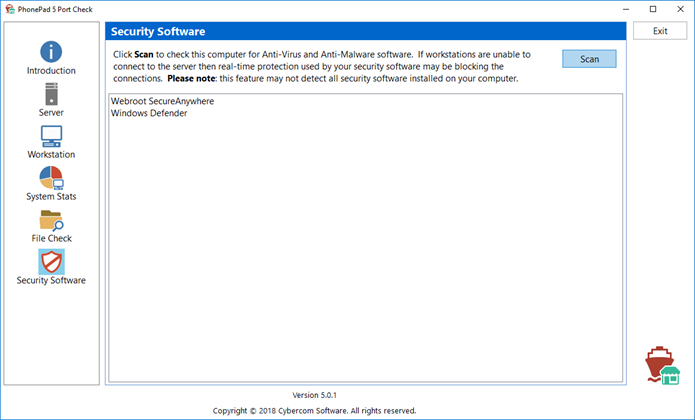
6 – Checking What Security Software You Have Installed
- Select Security Software.
- Click the Scan button.
7 – What If the Ports Are Still Closed?
Hopefully by now the ports are reporting that they’re open. If there are still closed ports then something is definitely blocking the ports.
At this point:
- We have confirmed that the services are running.
- We have reapplied the firewall rules so that shouldn’t be the problem.
- We have checked the PhonePad files and they are all there.
The only thing left is to check your security software.
- Some security software have their own firewall. While many honor the Windows Firewall Rules, some do not. You may need to configure the firewall in your security software to allow the ports to be used.
- Another big problem is real-time protection. This may be preventing the ports from being open. You may need to exclude the PhonePad folders and/or files from real-time protection.
If you have more than one security application installed you will probably have to configure each one individually. While we will provide advice whenever we can, we can’t actually help you with this as there are too many anti-virus and anti-malware programs available for us to know how to configure every one of them. You will need to contact the company that produces the security software.
Important Note: Some users find that a previous version of PhonePad connected fine but then they start having connection problems after installing an update. This can happen because security software sees the update as different software as its signature is different. If PhonePad had to be excluded in the security software previously then it will have to be excluded again for the update.
8 – What Now?
If there are port scans that are still coming up red then you will need to work out what is blocking PhonePad before you can continue.
If you have gotten this far and everything is now ok, ie. the port scans are all green, then the next step is to try logging in to the PhonePad Workstation software on your Server or Host PC. If you can’t login from the Server or Host PC then you may need to go back into your security software and configure it to allow PhonePad to run.
If you can login successfully from the Server or Host PC then proceed to Part B.
Part B – Checking Workstations
Only continue with this section if you have determined that PhonePad on the Server or Host PC because there is no point continuing if the Server or Host PC is not work correctly.
1 – Log in to PhonePad
If you can successfully login to PhonePad then you’re all done. If you can’t login then move on to the next step.
2 – Set PhonePad to Run as Administrator
- If you haven’t done so already, download PortCheck to each workstation.
- Select File Check.
- Click the Run as Administrator button.
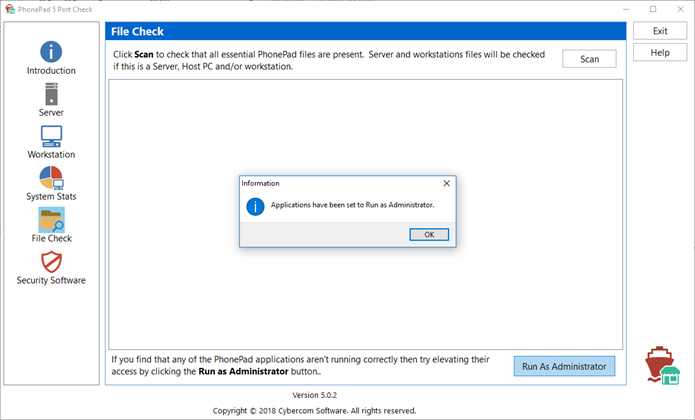
- Try logging in to PhonePad again. If you can login now then you’re good to go, otherwise continue to the next step.
3 – Check for Multiple Servers
- Open PortCheck by right-clicking on its icon and selecting Run as Administrator from the popup menu.
- Select Workstation.
- Select Server Scan.
- Click the Scan button.
- Wait while the scan does its job. This can take up to 10 seconds.
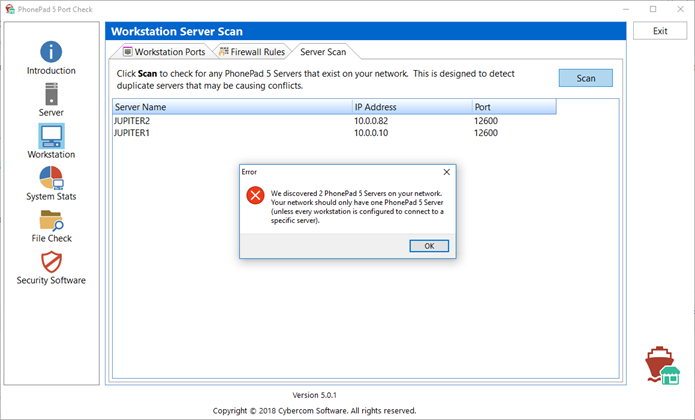
- In this example we have found 2 PhonePad Servers on the network. This is not good as it can cause conflicts.
- The list shows the name of the computer each PhonePad Server was found on and its IP Address.
- You will need to work out which computer is the correct Server or Host PC and uninstall PhonePad Server and any of the other computers it appears on.
4 – Scan the Workstation Ports
Just like we did on the Server or Host PC, we’re now going to scan the ports on the workstation. There are less ports to scan on a workstation than on the Server or Host PC.
- Select Workstation Ports.
- Enter the IP Address of the Server or Host PC.
- Click the Scan button.
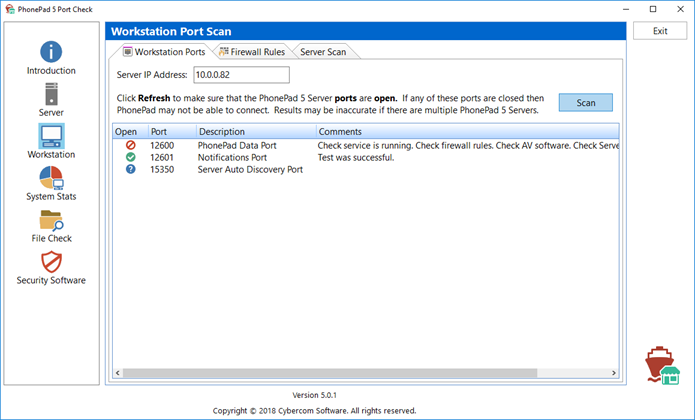
Ok, so there’s some good news and some bad news.
The PhonePad Data Port shows as red which means it’s closed.
The Notifications Port is green so that port is open.
The Server Auto Discovery Port shows a question mark, which means the scan was unable to determine the port’s status. It’s not open so that’s not good news.
5 – Workstation Firewall Rules
Even if the previous test showed that all ports are open, if you are unable to login to PhonePad then we should check the Firewall Rules.
- Select the Firewall Rules tab under Workstation.
- There will be fewer firewall rules – typically around 10.
- Click the Reapply Firewall Rules button just to ensure they are all there.
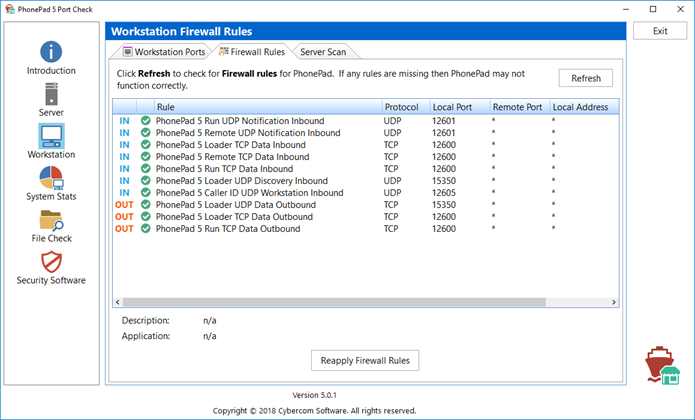
If any port tests failed before, try scanning the ports again and see if they pass. If they do, try logging in to PhonePad again. If you can login now then you’re all done. If not, continue to the next step.
6 – Check Your Workstation Configuration
- Go to the PhonePad folder on your workstation (C:\PhonePad5).
- Open WorkstationConfig.
- Under the Server Auto Discovery tab, make sure that the Enable Auto-Discovery of Server option is selected.
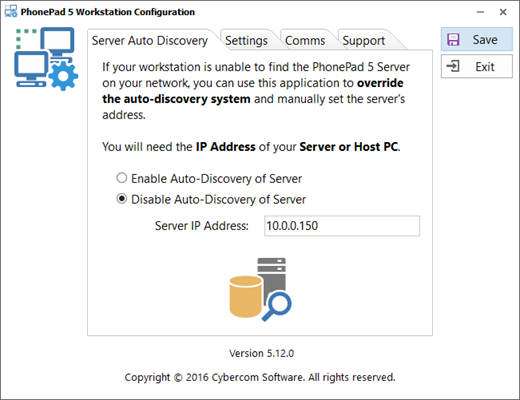
- In this example, the Auto-Discovery is overridden because the Disable Auto-Discovery of Server is selected, and the IP Address for the server is wrong. This would prevent PhonePad from connecting to the Server or Host PC.
- In this case we would select Enable Auto-Discovery of Server, and to play it safe remove the IP Address. Then we would click the Save button to save the changes.
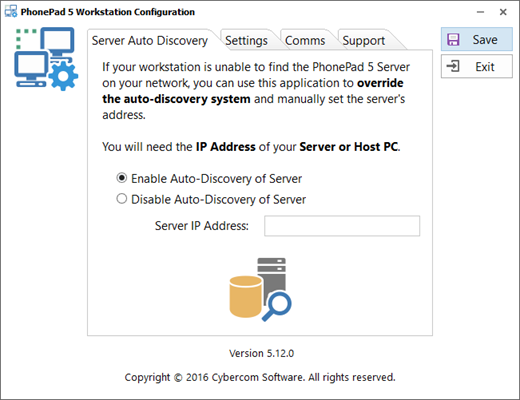
If Auto-Discovery was disabled on your workstation and you enabled it and saved the settings, try logging in to PhonePad again.
7 – Check the Security Software (Anti-Virus/Anti-Malware) on Your Workstations
If you get this far in the process and are still unable to successfully login to PhonePad then you will need to check the security software on your workstation(s). If you have more than one type of security software installed you will need to do this with all of them.
If the security software has any form of real-time protection either exclude the PhonePad folder (C:\PhonePad5) or PhonePad5.exe and PhonePadRun.exe from being scanned.
Important Note: Do not exclude the PhonePad 5 folder/files from scheduled scans, just real-time protection.
Another Important Note: Some users find that a previous version of PhonePad connected fine but then they start having connection problems after installing an update. This can happen because security software sees the update as different software as its signature is different. If PhonePad had to be excluded in the security software previously then it will have to be excluded again for the update.
Finally, if you get to this point, have tried everything in this blog article, and still can’t login to PhonePad, please contact Support and we’ll do our best to help resolve your issue.
