


- Getting Started
- Learning Center
- How Do I?
- Online Help
- Manuals
- FAQs
- Video Training
- PhonePad Trial Lessons
- Articles
- Phone Message Pads
- Logging Phone Calls
- What is PhonePad?
- Digital Phone Message Pad
- Replace Paper Phone Message Pads
- How Receptionist Take Phone Messages
- Phone Message Software FAQ
- Phone Message Templates
- How to Take a Phone Message
- Receptionist Phone Message Etiquette
- Receptionist Tools
- Phone Message Systems for Law Firms
- Managing Phone Messages in Medical Offices
- Phone Message Example
- Phone Message Management


PhonePad Web
Installing and Setting Up PhonePad Web

Products
PhonePad
•
Overview
•
Features
•
Why You Need PhonePad
•
Pricing
•
Licensing PhonePad
•
Upgrading from PhonePad 4
MessageSender
•
Licensing MessageSender
•
Setting Up MessageSender
Appointment Calendar


Before We Get Started
You will need to have PhonePad Version 5.87.0 or later installed. If you have an earlier version installed then you will
need to update here before continuing.
For Licensed Users
Please login to your online PhonePad account and download the 5.87.0 Server Update or later if you don’t already have
it.
For Trial Users
Please login to your online PhonePad Trial account and download the 5.87.0 Server Update or later if you don’t already
have it.
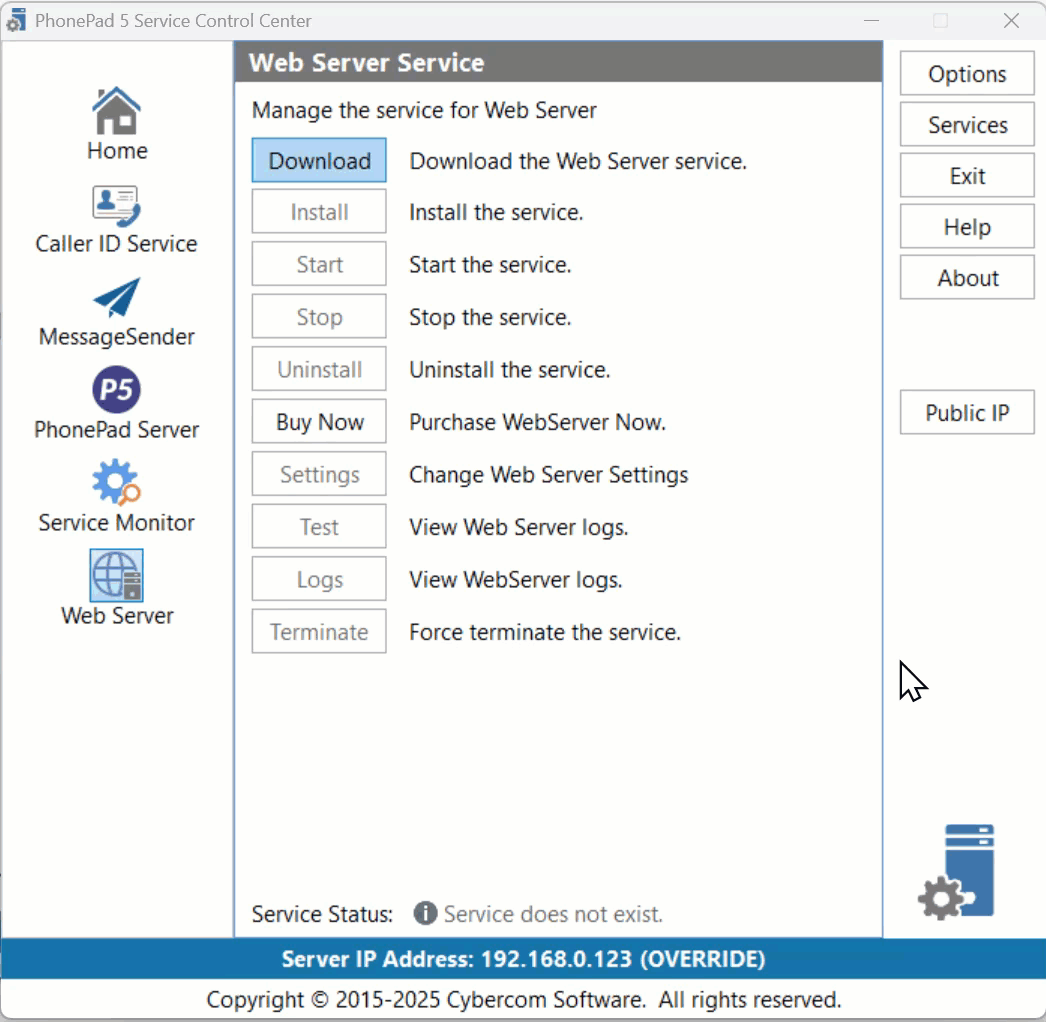
Step 1: Download and Install PhonePad Web Server
1.
Open Control Center on your Server or Host PC.
2.
Select Web Server.
3.
Click the Download button. When it finishes downloading it will automatically start the installer. Follow the
directions.
4.
Install the Web Server service by clicking the Install button.
5.
Click the Start button to start the service.

Copyright © 1995 - 2025 Cybercom Software. All rights reserved. Family Owned Business since 1995.
Cybercom Systems International Pty Ltd, trading as Cybercom Software.


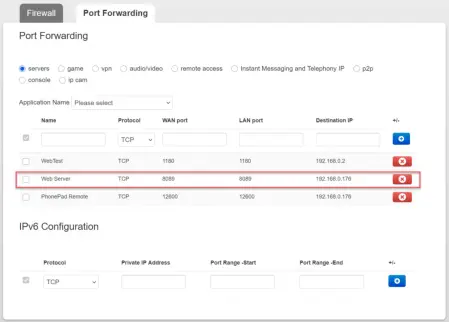
Port Forwarding has been set up to forward communications on port 8089 (the default port for PhonePad Web) to the
Server IP Address of the PhonePad Web Server (which is also the IP Address for the PhonePad Server).
If you don’t already have the IP Address of your PhonePad Server then you can get it from the main screen of Control
Center.

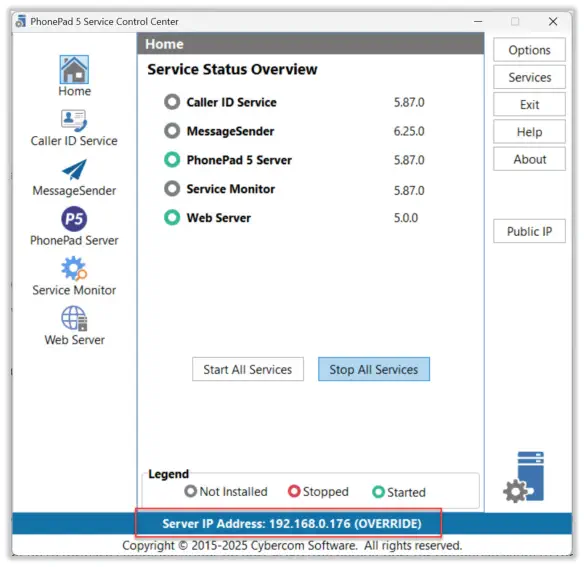
If you double-click on the IP Address it will copy it to the clipboard so that you can paste it into the IP Address field in
your router‘s user interface (as shown above).
Step 2: Set Up Port Forwarding on Your Router
For the PhonePad Web application to work, you need to forward requests to your PhonePad Web Server. To do this,
you will need to set up port forwarding on your router. As every router brand has their own user interface, it’s not
possible to include instructions for every router available on the market.
In many cases the Port Forwarding feature will be listed under the Firewall options. Here is an example:
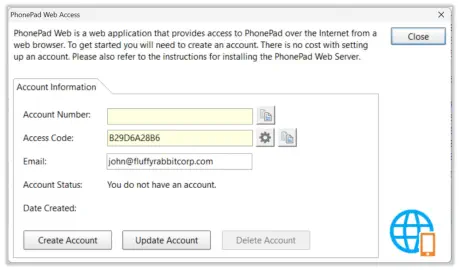
Step 3 - Create a PhonePad Web Account
Now that all of that is set up, we need to create a PhonePad Web account so that you can connect over the Internet.
1.
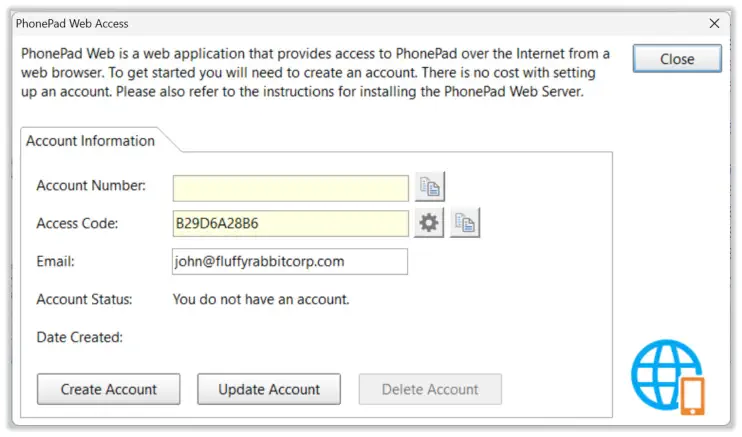
Select the System Admin tab in PhonePad.
2.
Click on the PhonePad Web Access button on the toolbar (shown below). Or select PhonePad Web Access from
the System Admin menu.
3.
Click the button next to the Access Code field to create an Access Code (this is like a password that users will use
to login).
4.
Enter an email address in the Email field. This would normally be the email address that you use to login to your
My PhonePad account.

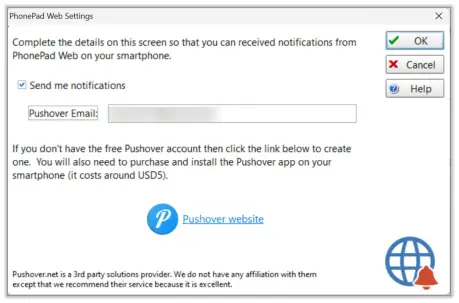
Notifications
There’s one thing left to do. Set up notifications so that you can get notified whenever you receive a new message.
Each user will need to do this.
To do this, you will need the Pushover app on your smartphone. If you don’t already have it, head over to Pushover.net
and create a free account. The Pushover app costs just USD4.99 (one-time cost). You get up to 10,000 free messages
per month.
Once you have created your account you will have a Pushover email address. Make a note of it.
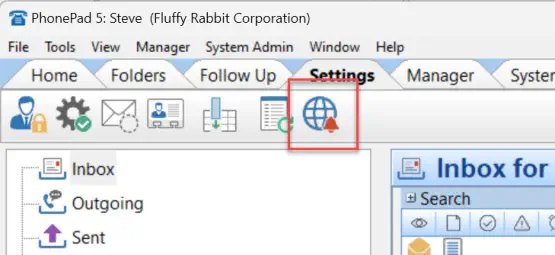
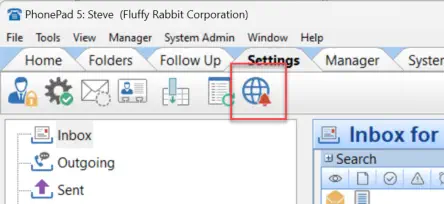
In PhonePad:
1.
Select the Settings tab.
2.
Click on the PhonePad Web Settings button on the toolbar (as shown below).

The are copy buttons next to the two yellow fields that will copy the Account Number and Access Code to the
Windows clipboard. Users will need both of these details to login.
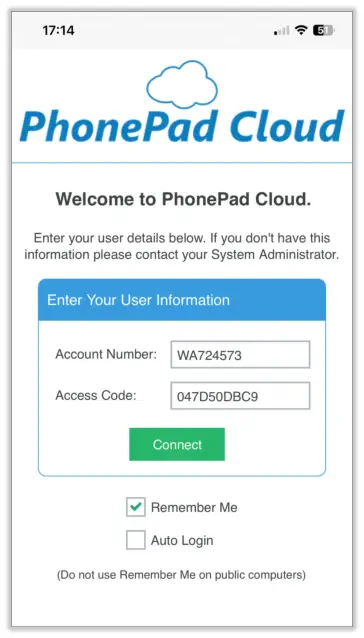
Step 4 - Test to Make Sure You Can Login.
Everything is now setup. Let’s make sure you can login.
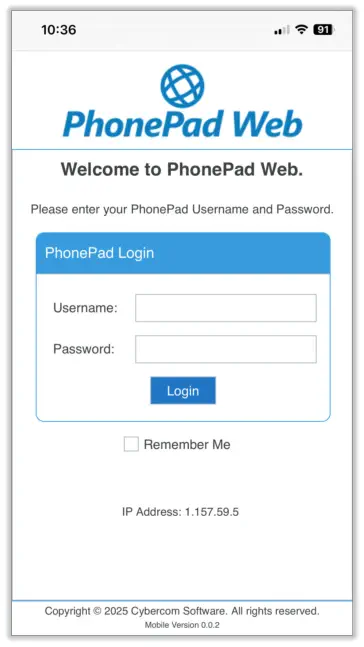
1.
Open a browser on your smartphone.
2.
Go to this web address: www.phonepadcloud.com.
3.
You should see this screen:
4.
Enter your Account Number.
5.
Enter your Access Code.
6.
You might want to check the Remember Me checkbox so you don’t have to enter this in each time. You can also
check the Auto Login checkbox to login you in automatically each time.
7.
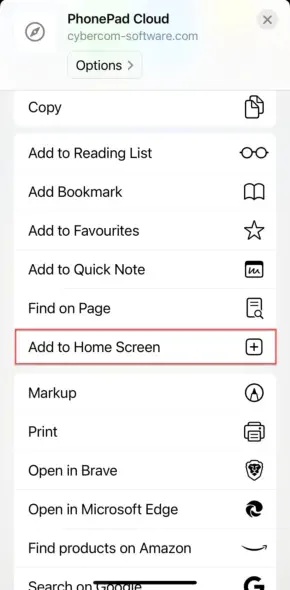
Some browsers enable you to add web apps to your Home Screen. This can save a lot of time.
8.
Click the Connect button to connect to your PhonePad Web Server.
9.
The next thing you should see is the PhonePad Web login screen.
10.
Login as you normally would when you login to PhonePad.
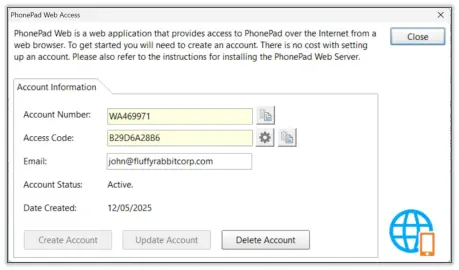
5.
Click the Create Account button.
You should now have a PhonePad Web account.
If you scan this page you might think that it’s a lot to set up, but it’s actually not. We have tried to break it down into
simple steps.
It shouldn’t take long to do, but of course we are always happy to help if you run into trouble or don’t understand
something.
3.
Enter your Pushover email address and check the Send me notifications checkbox.
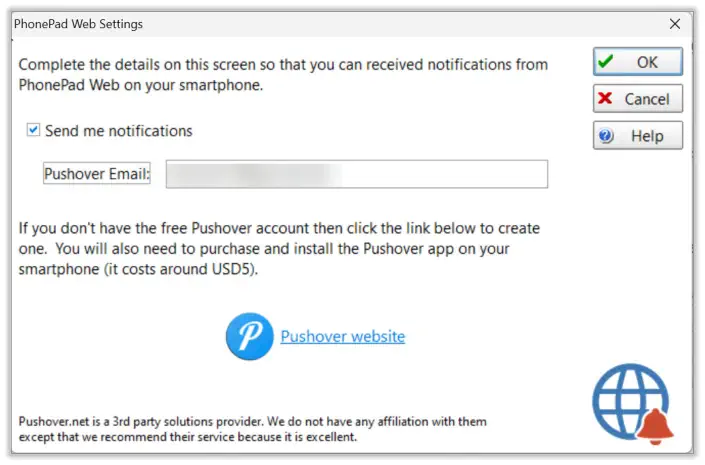
4.
That’s it, you’re all done and ready to go.


PhonePad Web
Installing and Setting Up
PhonePad Web

Before We Get Started
You will need to have PhonePad Version 5.87.0 or later
installed. If you have an earlier version installed then
you will need to update here before continuing.
For Licensed Users
Please login to your online PhonePad account and
download the 5.87.0 Server Update or later if you don’t
already have it.
For Trial Users
Please login to your online PhonePad Trial account and
download the 5.87.0 Server Update or later if you don’t
already have it.
Step 1: Download and Install PhonePad
Web Server
1.
Open Control Center on your Server or Host PC.
2.
Select Web Server.
3.
Click the Download button. When it finishes
downloading it will automatically start the installer.
Follow the directions.
4.
Install the Web Server service by clicking the Install
button.
5.
Click the Start button to start the service.
If you scan this page you might think that it’s a lot to set
up, but it’s actually not. We have tried to break it down
into simple steps.
It shouldn’t take long to do, but of course we are always
happy to help if you run into trouble or don’t understand
something.
Port Forwarding has been set up to forward
communications on port 8089 (the default port for
PhonePad Web) to the Server IP Address of the
PhonePad Web Server (which is also the IP Address for
the PhonePad Server).
If you don’t already have the IP Address of your
PhonePad Server then you can get it from the main
screen of Control Center.
Step 2: Set Up Port Forwarding on Your
Router
For the PhonePad Web application to work, you need to
forward requests to your PhonePad Web Server. To do
this, you will need to set up port forwarding on your
router. As every router brand has their own user
interface, it’s not possible to include instructions for
every router available on the market.
In many cases the Port Forwarding feature will be listed
under the Firewall options. Here is an example:
Step 3 - Create a PhonePad Web Account
Now that all of that is set up, we need to create a
PhonePad Web account so that you can connect over the
Internet.
1.
Select the System Admin tab in PhonePad.
2.
Click on the PhonePad Web Access button on the
toolbar (shown below). Or select PhonePad Web
Access from the System Admin menu.
3.
Click the button next to the Access Code field to
create an Access Code (this is like a password that
users will use to login).
4.
Enter an email address in the Email field. This
would normally be the email address that you use to
login to your My PhonePad account.

5.
Click the Create Account button.
You should now have a PhonePad Web account.
The are copy buttons next to the two yellow fields that
will copy the Account Number and Access Code to the
Windows clipboard. Users will need both of these
details to login.
Step 4 - Test to Make Sure You Can Login.
Everything is now setup. Let’s make sure you can login.
1.
Open a browser on your smartphone.
2.
Go to this web address: www.phonepadcloud.com.
3.
You should see this screen:
4.
Enter your Account Number.
5.
Enter your Access Code.
6.
You might want to check the Remember Me
checkbox so you don’t have to enter this in each
time. You can also check the Auto Login checkbox
to login you in automatically each time.
7.
Some browsers enable you to add web apps to your
Home Screen. This can save a lot of time.

8.
Click the Connect button to connect to your
PhonePad Web Server.
9.
The next thing you should see is the PhonePad Web
login screen.
10.
Login as you normally would when you login to
PhonePad.

Notifications
There’s one thing left to do. Set up notifications so that
you can get notified whenever you receive a new
message. Each user will need to do this.
To do this, you will need the Pushover app on your
smartphone. If you don’t already have it, head over to
Pushover.net and create a free account. The Pushover
app costs just USD4.99 (one-time cost). You get up to
10,000 free messages per month.
Once you have created your account you will have a
Pushover email address. Make a note of it.
In PhonePad:
1.
Select the Settings tab.
2.
Click on the PhonePad Web Settings button on the
toolbar (as shown below).
3.
Enter your Pushover email address and check the
Send me notifications checkbox.
4.
That’s it, you’re all done and ready to go.
Products
PhonePad
•
Overview
•
Features
•
Why You Need PhonePad
•
Pricing
•
Licensing PhonePad
•
Upgrading from PhonePad 4
MessageSender
•
Licensing MessageSender
•
Setting Up MessageSender
Appointment Calendar
Copyright © 1995 - 2025 Cybercom Software. All rights reserved. Family Owned Business since 1995.
Cybercom Systems International Pty Ltd, trading as Cybercom Software.


